URL Scheme是类似
http://,ftp://,afp://这样的东西,通常是用传输协议作为URL Scheme。不过事实上,你可以在iOS和Mac中注册任何类型的URL Scheme。当用户在浏览器中访问你的自定义URL Scheme的链接的时候,操作系统就会打开你的程序,响应这个请求。
要在程序中注册自定义URL Scheme非常简单。主要分为两个步骤:在程序的Info.plist中加入你需要注册的URL Scheme,然后在你的应用程序中加入处理这类请求的代码。
其中,第一个步骤对于iOS和Mac应用程序来说是完全相同的。方法如下:
在
Info.plist中,增加一个字段,名称为CFBundleURLTypes(URL Types)。Xcode会自动为你创建一个必须的键:URL Identifier(CFBundleURLName),这个键的值可以赋值为一个唯一的字符串。通常是逆向的域名结构,如:me.venj.myapp。然后在URL Types这个键下增加一个子项:CFBundleURLSchemes(URL Schemes),这里填入你想注册的URL Scheme的名称,如:cloud。你可以增加多个URL Scheme。
下面是一个示例的XML结构:
这样,我们就可以在程序中处理请求了。下面我们来分别看一下iOS和Mac下的处理方法:
iOS:
在iOS中,我们可以在AppDelegate中加入一个方法,来处理这个请求。对于iOS 4.1或更早的系统,使用
-application:handleOpenURL:方法,对于iOS 4.2以后的系统使用:-application:openURL:sourceApplication:annotation:方法。
下面是示例代码:
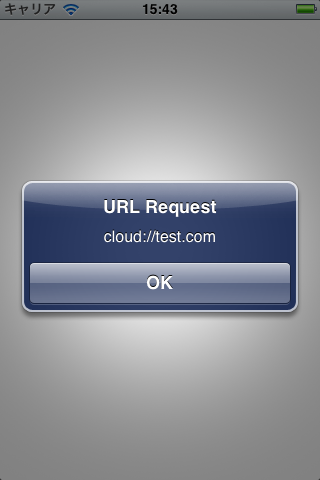
我们的演示程序只是简单的显示了一个
UIAlertView来响应请求。实际应该如何处理那就看需要了。
效果如下:
Mac:
Mac下处理自定义URL Scheme的请求稍有不同。我们首先要在
-applicationDidFinishLaunching:方法中注册一下,并指定处理URL请求的方法。如下:
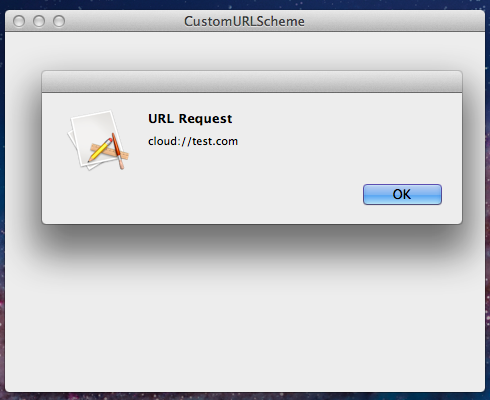
类似的,我们在示例程序中还是简单的用了一个
NSAlert来展示我们成功捕获到了这个URL Scheme的请求。
效果如下:
好了,关于自定义URL Scheme就讲这么多,用起来很简单吧。
没有评论:
发表评论